The Ceph documentation states that you need more than 3-4 host to have a decent performance, but this is a Homelab, I cannot afford to be running more than 3 machines for this.
Just installed Proxmox on the 2nd machine.

DevOps, Virtualizacion, Linux, Seguridad y un poco mas..

The Ceph documentation states that you need more than 3-4 host to have a decent performance, but this is a Homelab, I cannot afford to be running more than 3 machines for this.
Just installed Proxmox on the 2nd machine.


Ceph is the future of storage; where traditional systems fail to deliver, Ceph is designed to excel. Leverage your data for better business decisions and achieve operational excellence through scalable, intelligent, reliable, and highly available storage software. Ceph supports object, block and file storage, all in one unified storage system.
That’s the official definition from Ceph website. It’s it true?
I don’t know. Want to find out!
Since few weeks ago I’ve been in the planning stage to install and configure Ceph in a 3-node cluster, everything done via Proxmox UI. One of the main issues with this solution, the storage devices. how’s that?
Well.. it doesn’t like Consumer SSD/Disks/NVME.
BoM:
Note: The storage listed here will be used for Ceph OSD, there is a dual 10GbE card on each host for replication.
I have a pair of 970 EVO Plus (1TB) that were working fine with vSAN ESA, decide to move to Intel Enterprise NVMe because a lot of information around the web points to bad performance with this type of NMVe.
The Supermicro machine is already running Proxmox, lets the Ceph Adventure begins!
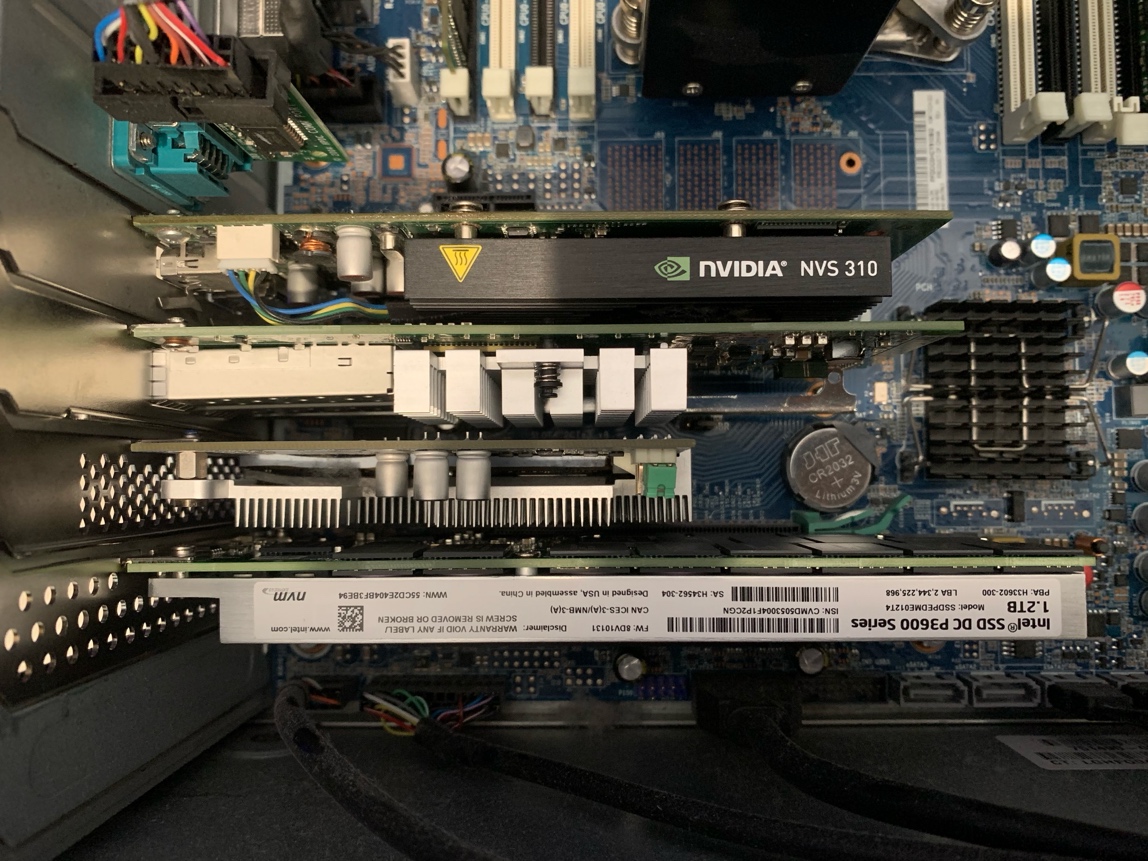
This picture is one of the Z440, is full in there!!

Let’s do this.
I think this is the second English-post in the entire history of this blog. Be gentle with me.
KubeVirt, is a known name for the people already doing containers, a normal player for people in the OpenShift world, but why if you come from others environment (VMware?) is like this doesn’t exist or is just being ignore?
If you can read Spanish and go back in the post history of this site, you can see that when is about VMs, VMware was the only option, not the same with Kubernetes, I started playing with K8s since 2018 and by that time, VMware didn’t have an offering that can compete with K8s. so I stick with K8s installed directly with kubeadm or the Rancher’s offering (RKE, RKE2 and K3s).
Why did I do a little recap?
Because is time to start trying new solutions to manage our VMs.
I love Harvester, love the fact that it can connect to Rancher UI and can be managed from the same place that I already have my containers, but is so resource intensive! The same host that was running Proxmox and ESXi can’t cope with the demand, I hope that this solution keeps growing and get my hands on others! (looking at you Platform9!).
My next steps, read more about plain KubeVirt to know more how this thing works behind the nice UI provided by Rancher or OpenShift… wish me luck !
Convertir CloudBuilder Excel file a JSON!

Creo que el primer paso para levantar un entorno de VMware SDDC (VCF) es completar el documento de Excel (Deployment Parameter Workbook), este documento lo podemos ver como la receta con la cual se construira nuestro entorno SDDC.
Hace unos meses me encontré con la necesidad de automatizar la creación de un SDDC y tenia a mano el Paramenter Workbook, sin embargo, utilizar este documento de Excel en Ansible creo que no sería una tarea fácil y tampoco tengo el tiempo o conocimientos para lidear con eso.
CloudBuilder, es la VM que necesitamos desplegar inicialmente para proceder con la parametrización de nuestro entorno SDDC. CB nos permite hacer llamadas API (https://developer.vmware.com/apis/vcf/latest/), pero primero debemos convertir ese documento en Excel a JSON.
Dentro de CB contamos con una herramienta la cual nos permite hacer exactamento eso!
He visto muchos blog-post que ya nos presentan el archivo en JSON, pero creo que, si necesitamos hacer cambios, la manera más rápida y cómoda es editar el Paramenter Workbook.
Supportability and Serviceability (SoS) Utility
SoS además de permitirnos convertir excel a json, es una herramienta CLI que se puede usar para revisar la salud y colectar logs de un ambiente VCF.
sudo /opt/vmware/sddc-support/sos --help

sudo /opt/vmware/sddc-support/sos -h
En nuestro caso, primero debemos colocar nuestro documento excel en el home-directory del usuario admin, esto lo podemos hacer con WinSCP o scp (si estas en macOS o Linux), ya con el documento en el home-directory, procedemos a convertirlo a json usando el siguiente comando.
/opt/vmware/sddc-support/sos --jsongenerator --jsongenerator-input /home/admin/CB-Workbook.xlsx --jsongenerator-design vcf-ems
Ahora se preguntarán, que hago con este archive en JSON?
Automatizar ¡!
En mi caso particular, la forma más rápida de crear un entorno de pruebas es automatizando el proceso, el cual está basado en Ansible usando AWX como UI.
En este caso particular usaremos el mismo host de CloudBuilder para lanzar la creación del SDDC, para esto usaremos cURL.
curl 'https://localhost/v1/sddcs/validations' -i -u 'admin:VMware1!' -X POST \
-H 'Content-Type: application/json' \
-H 'Accept: application/json' \
-d '@vcf-ems.json'
Se iniciará un proceso de validación el cual se puede monitorear usando el ID que nos devuelve el POST anterior.
curl 'https://localhost/v1/sddcs/validations/<ID>/report' -i -u 'admin:VMware1!' -X GET \
-H 'Content-Type: application/json’
En esta respuesta nos interesa:
executionStatus – este campo puede tener un valor entre IN_PROGRESS o COMPLETED.
resultStatus – este campo puede tener un valor entre SUCCEEDED o FAILED.
Podríamos continuar siempre que executionStatus sea igual a COMPLETED y resultStatus sea igual a SUCCEEDED.
curl 'https://localhost/v1/sddcs' -i -u 'admin:VMware1!' -X POST \
-H 'Content-Type: application/json' \
-H 'Accept: application/json' \
-d '@vcf-ems.json'
La diferencia ahora es que la llamada API se hace directo a /v1/sddcs y la anterior la hicimos a /v1/sddc/validations.
Ya todo depende de que tan rapido sea el ambiente en el cual se esta ejecutando la creacion del entorno SDDC, en mi caso, en un ambiente nested, esto tomaba alrededor de 2 horas y 30 minutos.
Si se preguntan, porque pasar por todo esto si podiamos usar el Web UI de CloudBuilder?
La respuesta es que de esta manera podemos tener un ambiente que puede ser solicitado en demanda por otros miembros de un equipo, en mi caso lo usamos para crear ambientes de prueba donde validamos ciertas configuraciones de VCF y necesitamos una forma rapida de crear SDDC sin intervencion humana!
Organiza tu .dotfiles con GNU Stow.

Primero definamos la necesidad de GNU Stow (Stow en lo adelante), si tienes acceso a diferentes equipos, ya sea laptops (Linux o macOS), desktops (Linux o macOS) y servidores Linux (quien usa macOS en servidores?), talves has notado lo incomodo que es tener una configuracion de shell bien customizada pero cuando entras a otro equipo por ssh, hechas de menos todos esos alias y otras utilidades. Stow es la solucion para llevar estas customizaciones a otros entornos *nix.
En mi caso, tengo dos equipos de uso diario, Macbook Pro M1 y un Mac Mini M2. En ambos uso zsh como shell y tengo las mismas customizaciones ya que he instalado los mismos paquetes.
Oh My ZSH! (https://ohmyz.sh/)
Es un framework que maneja las configuraciones que se pueden aplicar a ZSH. Con esta herramienta podemos tener prompts, plugins y temas.