My network is overcomplicated on purpose. starting with my local network all the way to Linux machines in Miami, New York, Frankfurt, and Netherland working as BGP routers. I’ve been playing with VRF and iprules, looking for a reliable way to separate traffic generated towards my /24 and traffic that originates machine-to-machine for tunneling. Tunnels, this is where I always find issues, routing tables fighting each other, killing the traffic, and taking the tunnels down.
I know that VyOS has been around for more than 10 years, and I have used it before for my home-network but decide to go with plain Linux because of BIRD, I love that thing!
VyOS comes with FRR, it’s a powerful platform, but I know how to do things in BIRD (v1 or v2) using Pathvector. For my current configuration, the issues come with the traffic separation; VRF makes it so much easier than iprules or other networking tricks.
How did the whole reconfiguration of my network begin?
I read you ask….
history time!
For almost 2 years a Peplink Balance 30X was the responsible of my Internet access at home, managing 2 WAN and a tunnel to Miami using SpeedFusion, it was flawlessly, no issues, but it cost money. At first I was ok paying the “tax” for a working solution that you as a user don’t have to be messing around with it to work, but besides the cost, the lack of customization was limiting my tinkering brain from playing more with the router, it does his thing great but you cannot add your stuff like an Opensource Router, and it was lacking IPv6 support. Before moving to Peplink, an OPNSense was working as a firewall/loadbalancer, but the LB stuff was a hit and miss for me, with the Peplink it was rock-solid so I moved, them decide that I don’t want to pay for something that I can configure myself, put OPNSense back on an old Sophos XG125, and the pain began.
Here is the list of stuff that only worked when the moon aligned with the sun.
Load Balancing: this was very frustrating to make it work as I want it, I am not an expert on OPNSense, but coming from pfSense (used it for years!!), This doesn’t look like a hard configuration to make. Sometimes the failover/failback took forever, it wasn’t the biggest issue, and I started to accept that I didn’t know how to make it work.
Wireguard Tunnels: This was the killer. Looks like Wireguard has issues on OPNSense and sometimes it just dies. One thing I wish was working is the option to pin a WG connection on an interface, I know this works on Linux, but it looks like the version ported to *BSD has issues.
Tailscale Support: Another hit and miss, I have to reconfigure the tailnet related stuff two times without any reason, the config just disappears.
GUI: This thing was so slow on my hardware, and I didn’t want to buy a new one. Remember, moving away from Peplink was to save money, no spend it on new hardware.
OPNSense was running for almost three months, but I wasn’t happy with how things were going. Started looking around, didn’t want to use pfSense (just a personal decision).
What I considered:
Using a Mikrotik as an Internet router again. I use MT as my core router in my network and another one as the internal router for public traffic using public addresses advertised by AS207036 and routed to services hosted at home. I know my way on RouterOS.
Using OpenWRT, more for the WAN capabilities than firewall/routing.
Using VyOS. I didn’t want to learn the syntax to manage this; I was busy with other stuff, but I want to make this network easy to “manage”.
This is the list of things that I want to have; the platform with the most checkmarks will be selected.
- Support for BGP/OSPF, my home network relies on this to learn and announce prefixes, it’s been this way for more than 5 years, so I’m not moving away from this configuration.
- WAN Load Balancing, working from home, this is a must. My primary WAN is CLARO, which is stable as a rock, but you know, even the best has issues.
- Native Wireguard support. This is the way I want to connect to a remote VyOS machine in Miami; the same is achieved using Peplink + Speedfusion.
- Using the same WG tunnel, I expose internal services to the Internet.
- VRF support, putting this on the list makes VyOS almost the default winner. Yes, Mikrotik supports VRF, but I don’t like how RouterOS runs the multiwan logic.
- Tailscale support. This one looks to be supported on all three devices that I want to use.
- I may be missing more stuff but those were the main ones to start evaluating the new router/firewall to use.
Research.
The fastest way to see if my desired configurations are supported on VyOS was just asking ChatGPT for it. I went into ChatGPT and asked for configuration on VyOS with all the stuff I wanted.
Also, looking on Google, of course, this is still one of the more trusted ways to gather information. Sometimes ChatGPT hallucinated too much, and you need to keep telling it that a lot of configuration parameters changed from 1.4 to 1.5 (VRF almost completely changed).
What I find on this search? Gold!
https://lev-0.com/posts/
This site is pure gold!
The official documentation is an important resource; never try to configure a platform/software without reading at least the stuff related to the part interesting to you.
I choose to do a test-run with VyOS.
After finding a few blogposts about VyOS and MPLS/VRF/Segment Routing. Let’s do a test-run!
A lot of new stuff got added into VyOS since the last time I used it. Also, a lot of stuff was removed, for example, the STABLE version is not available for free anymore.
There is a Rolling release and Stream release. You can read more about it on this link https://vyos.net/get/
The documentation is awesome! https://docs.vyos.io/en/latest/
I am not going to do a detailed steps by steps paragraph on how to install VyOS, there is a lot of docs/videos on how to do that.
Installing VyOS at home.
This is an easy task, put the image on USB drive, boot the Sophos XG using that USB drive, install image, reboot.
Following my lists of want-to-have:
- Configure MultiWan. This part was completed using the official documentation about WAN Load-Balancing: https://docs.vyos.io/en/latest/configexamples/wan-load-balancing.html
- OSPF and BGP. Again, using the official documentation. https://docs.vyos.io/en/latest/configuration/protocols/ospf.html
- Create a link to VPS (FLRTR03) for Internet services access. https://docs.vyos.io/en/latest/configuration/interfaces/wireguard.html
- Using a VRF to separate traffic destine to WAN (CLARO and ORBIT) from traffic destine to my large-area-network (aka MESH). https://docs.vyos.io/en/latest/configuration/vrf/index.html
- The Tailscale part is still pending, haven’t started configurating that yet because I may be putting that traffic on his own VRF and doing route-leaking, will see.
- This one wasn’t part of the initial assessment, I ended connecting almost all the VyOS instances to Zerotier on different networks, I have two networks on ZT, one for CORE traffic and on for EDGE (EDGE is traffic going from my local network to the Mesh). For the Zerotier installation and configuration I used the Level-0 Networking Post: https://lev-0.com/2024/01/08/dynamic-multipoint-vpn-with-zerotier-and-vyos/
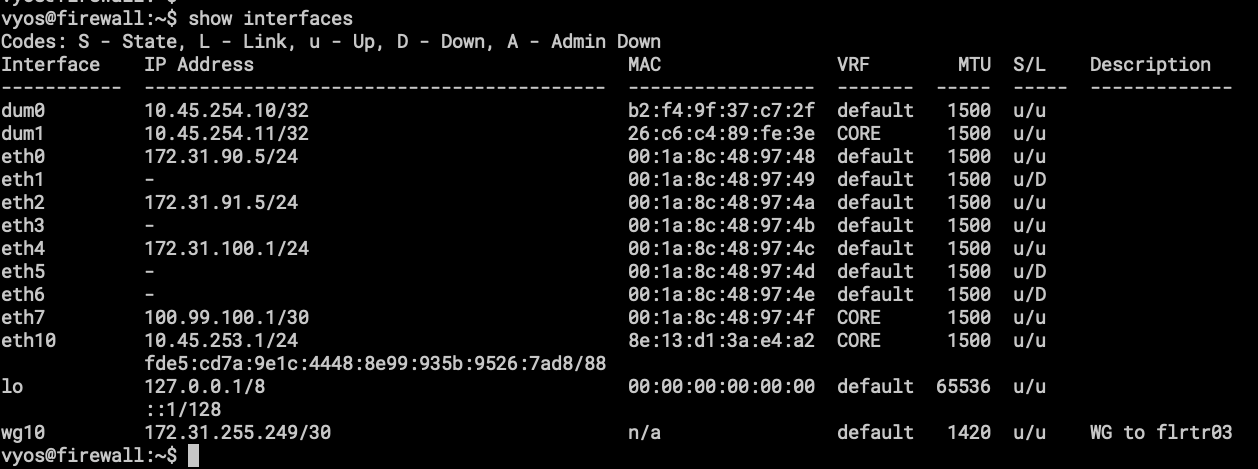
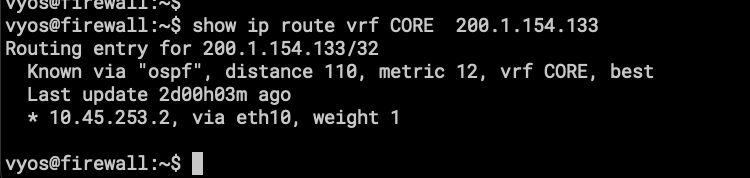
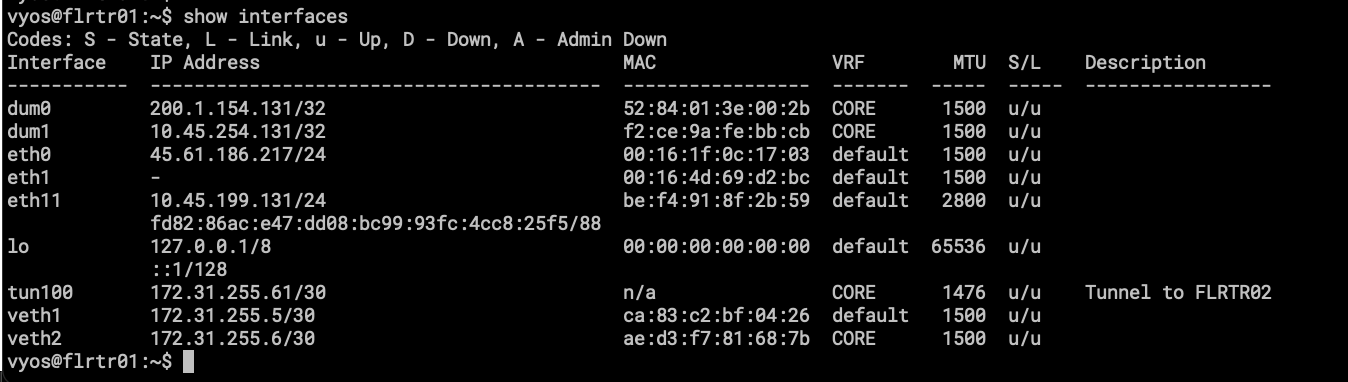
- show interfaces, here the important part is the VRF column, CORE is the VRF for traffic going into the Mesh.

- Here is the VRF showing only the interfaces attached to it.
- dum1 – loopback interface for OSPF and BGP.
- eth7 – point to point link for Mikrotik RB3011, from here I can announce local services to the internet using Public Addresses under AS207036
- eth10 – renamed ZT interface, this is a connection to FLRTR03 and FLRTR04 both in Florida.
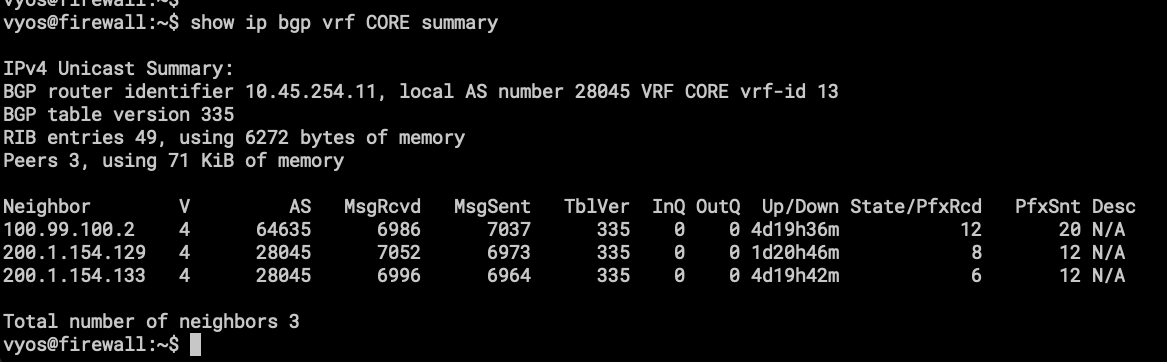
- BGP routing table on VRF CORE, the first one is the eBGP session with the RB3011, and the others are iBGP sessions to Route Reflectors, one in FL(FLRTR02) and another in NY(NYRTR02). AS28045 is internally used by the Mesh (VRF CORE).
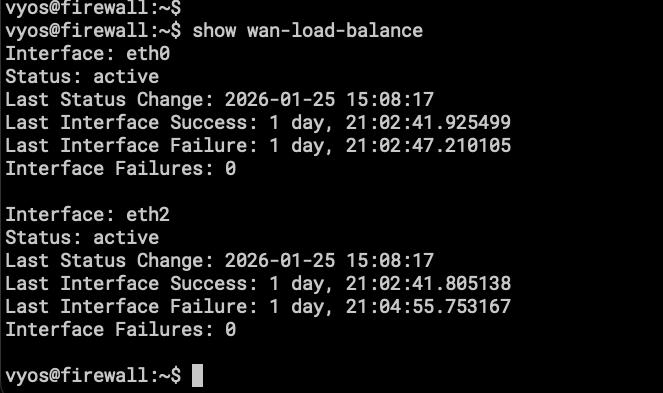
- We don’t have a nice UI for the WAN Load-Balancer status, the important part is that it works as expected!
The Home side of the reinstallation/reconfiguration is completed, I have internet and dual-wan-loadbalancing. Let’s move to the remote VPS for installation and configuration. As soon as the wan-loadbalacing and the tunnels were working, I stopped right there and didn’t test OpenWRT or even try to replicate the configuration on Mikrotik.
One thing to notice here is that the resource consumption on the same device is abysmal. With OPNsense the RAM was always more than 50%, the following image is from LibeNMS.

You can guess when the machine was moved to VyOS.
VPS at BuyVM.
The steps detailed here are based on the configuration of a VPS hosted at BuyVM. The initial setup is done using the VPS Management Console offered by the provider.
First, the installation media needs to be available to us at the Stallion portal (this is the name of the management platform), the platform provides an easy way to do that, you just need the URL of the ISO image so the platform can download the media and make it available to be attached to the VPS. Once the image is attached, the process is the same as installing locally on a sever/vm/pc, follow the steps after running install image.
You now have a VyOS router with 1 virtual NIC, yes, just 1. And you will ask me, how can this be useful with only one NIC, and my response will be “Tunnels, tunnels everywhere” with that meme of Toy Story on my head.
I will try to describe all the configurations that I put on this VyOS to make it route traffic to and from my home-network.
Like with the VyOS at home, the first thing I installed was the Zerotier container. I did the rename process for the ZT interface to appear as an Ethernet interface, and joined it to the virtual switch that belongs to this part of the network. This virtual switch is called CORE, like the VRF.
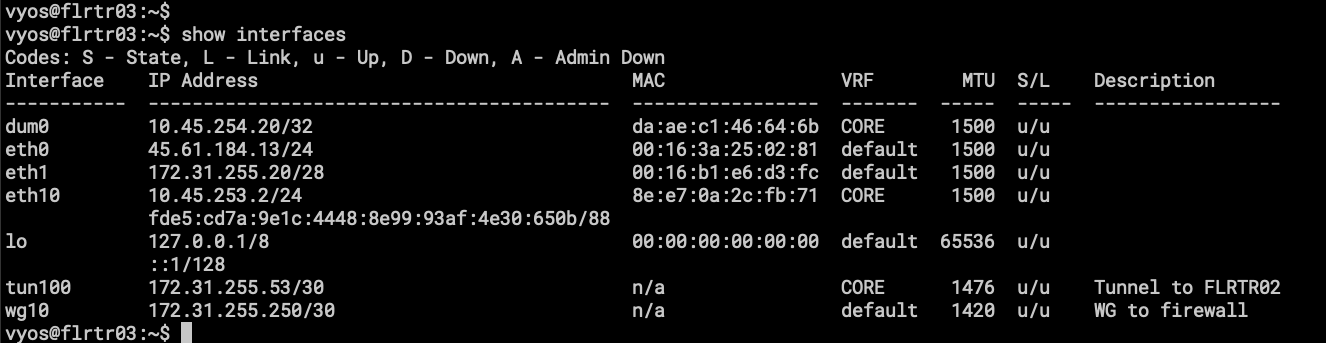
- Here we have eth0, which is the uplink to the internet provided by BuyVM. Don’t pay attention to eth1, is an interface that is supposed to let me reach other VPS in the same region but looks like it has issues with OSPF.
- eth10, the same as the VyOS called firewall, this is a virtual connection to Zerotier Virtual Switch and is part of VRF CORE.
- tun100 is a GRE Tunnel to FLRTR02, as the description says.
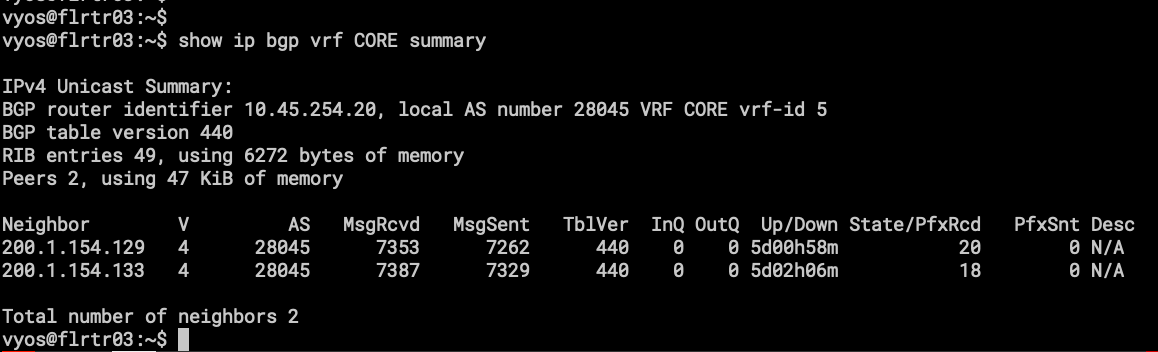
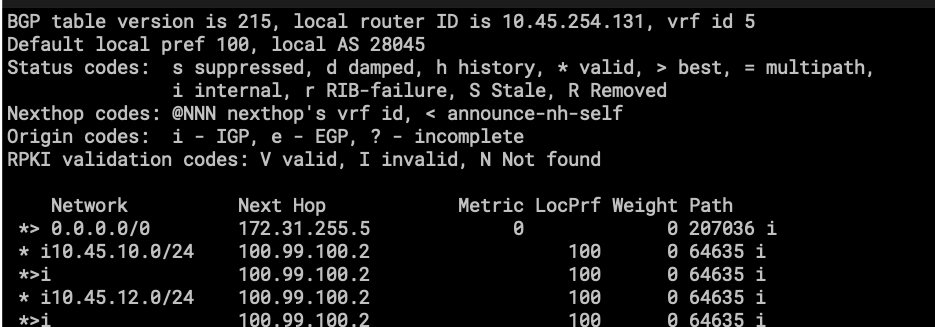
- the BGP sessions on VRF CORE, one difference here is that only AS28045 will be present, because this VyOS works as upstream to my local-network and nothing more. Those BGP sessions are peering with the Route Reflectors (FLRTR02 and NYRTR02).
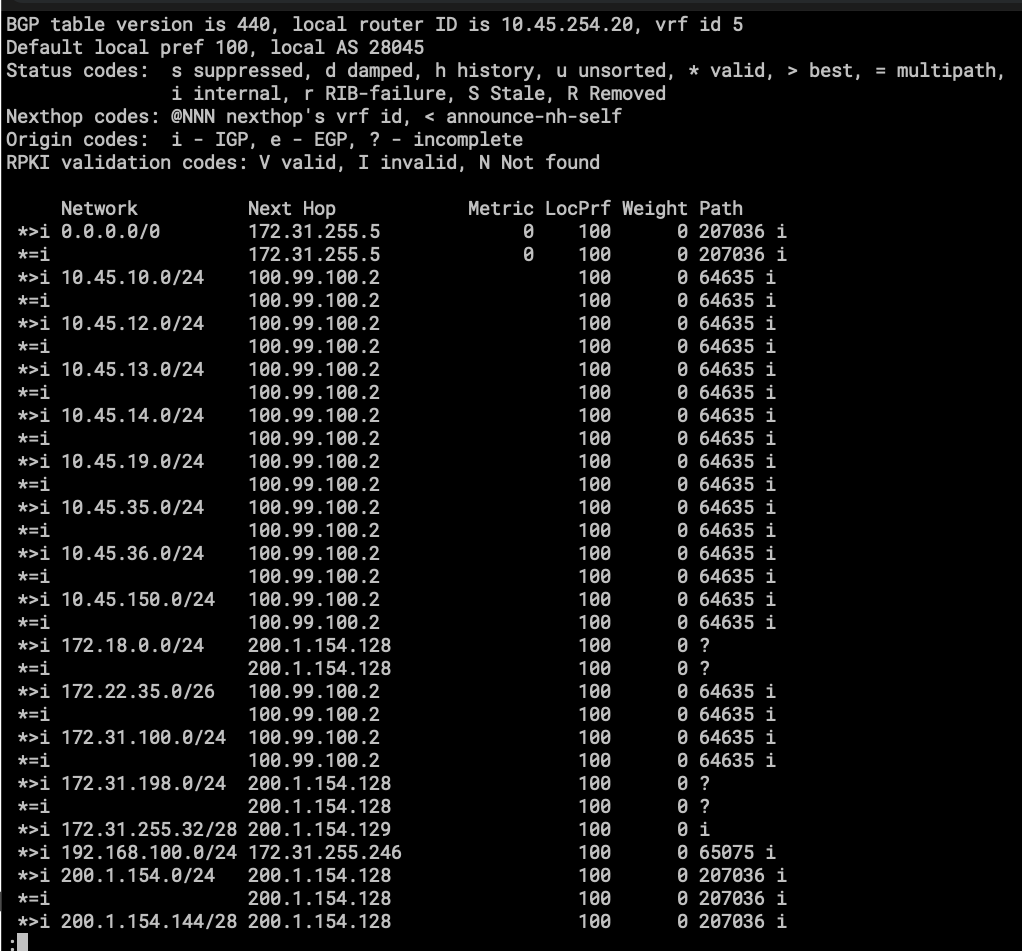
- part of the routing table on VRF CORE.
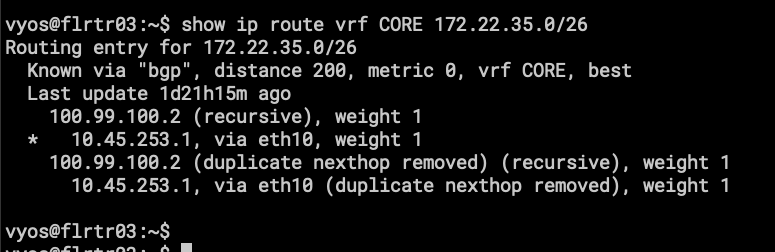
- 172.22.35.0/26 is a subnet on my Home Network.
Its basically the same configuration for all VPS except for:
FLRTR01, NYRTR01, NLRTR01(pending install) and DRRTR01(pending install).
Let’s unpack this so it’s easy to understand. In networking, the best way to understand routing is with a network diagram.
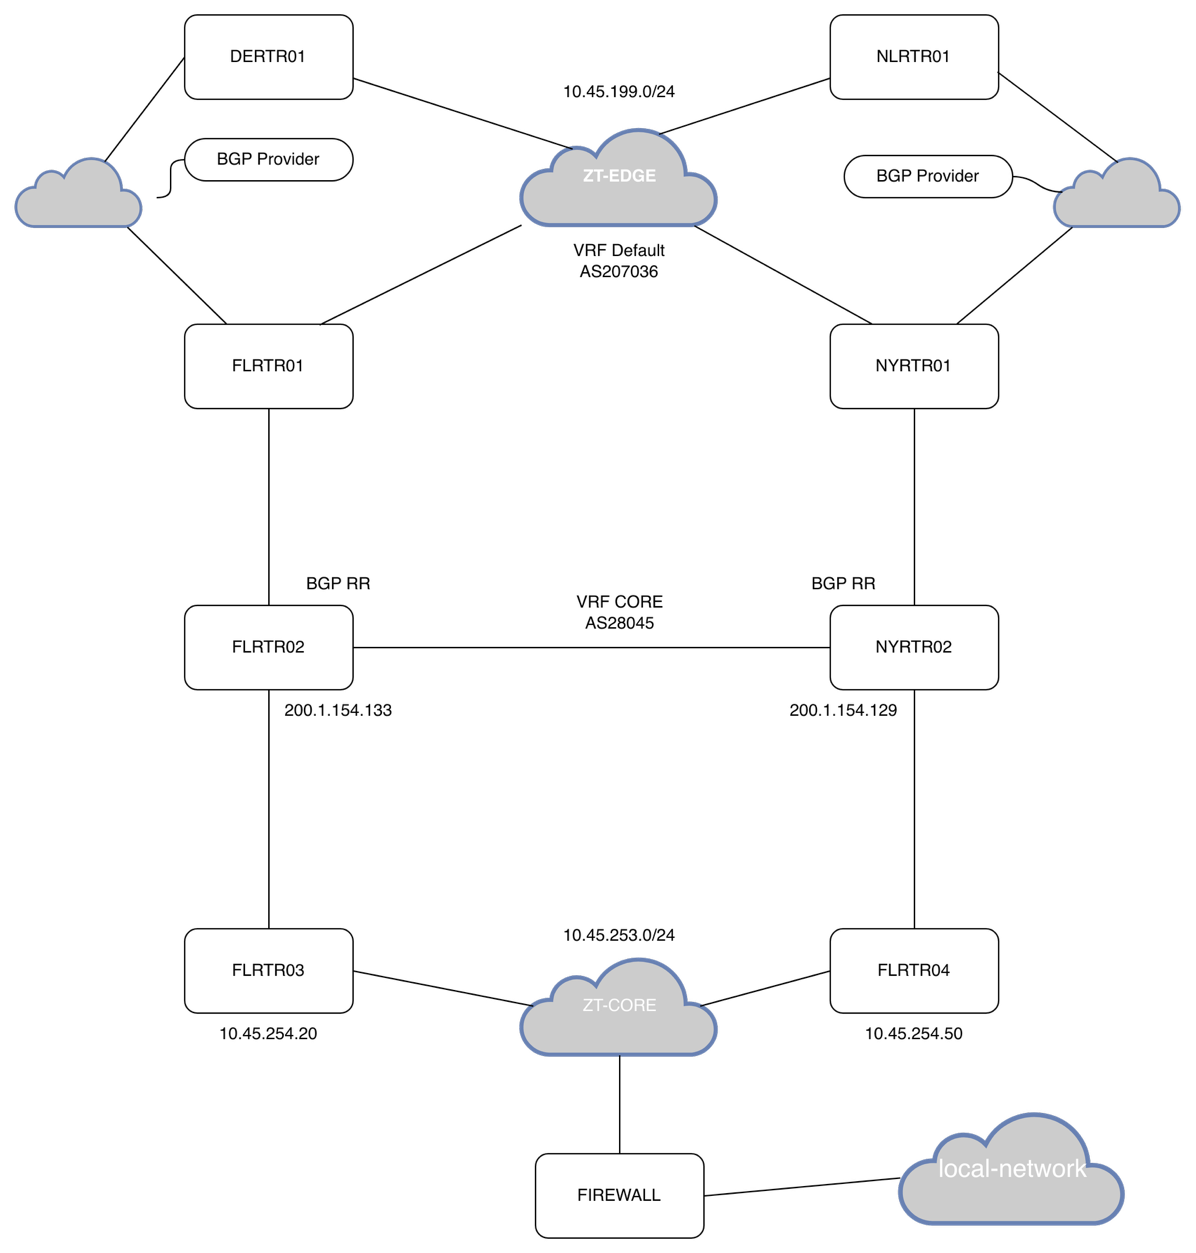
I feel bad for my poor network-diagram-jutsu.
Here I will try to describe how the connections are going out from my network to the Mesh.
Firewall is connected to FLRTR03 and FLRTR04 using Zerotier. They all have a VRF named CORE with eth10 added to it. OSPF is running on all the VyOS instances and all the Mikrotik CHR (FLRTR02 and NYRT02 are CHR).
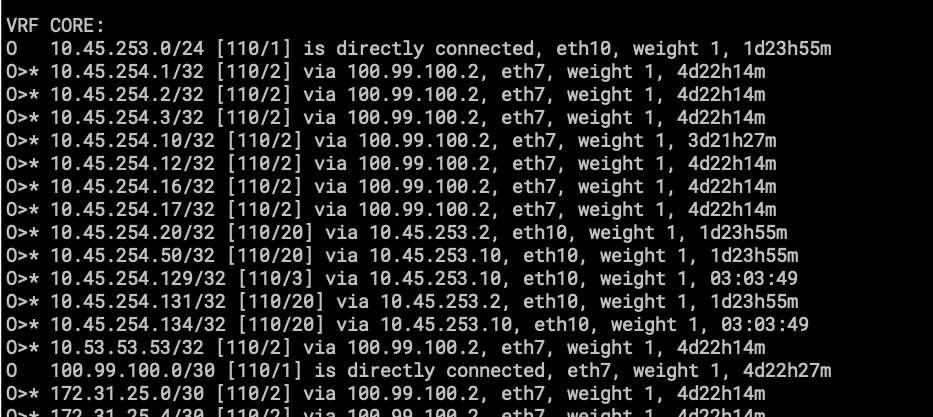
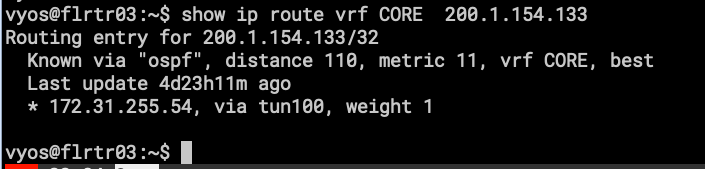
- show ip route vrf CORE ospf
Only importing and exporting /32 /31 and /30 into the OSPF routing table, this is for neighbor reachability for BGP.
- one of the Route Reflectors
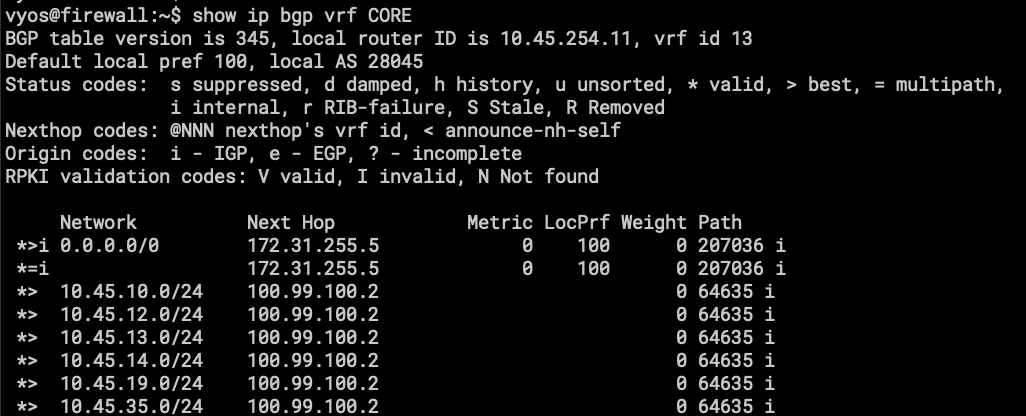
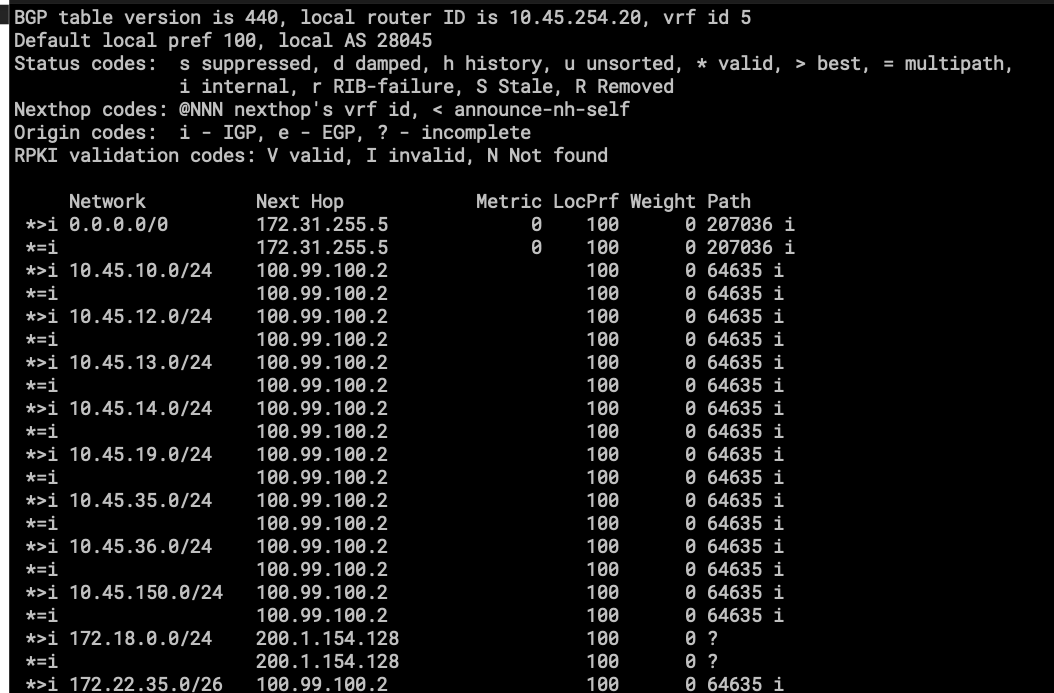
- show ip bgp vrf CORE
- here is the BGP routing table, or part of it to be exact.
Let’s go a router up in the network.
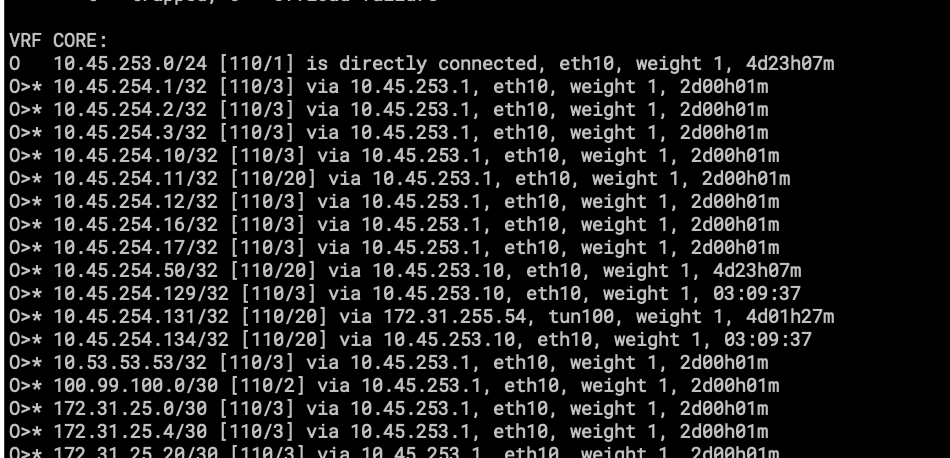
- This is the OSPF routing table on FLRTR03 that is connected directly to FIRWALL using Zerotier.
- Here, the network starts to get bigger, with more routes and more links.
Everything is the same for FLRTR04.
Things got different for FLRTR01. This VyOS has VRF CORE and has configurations on Default (sometimes called VRF EDGE).
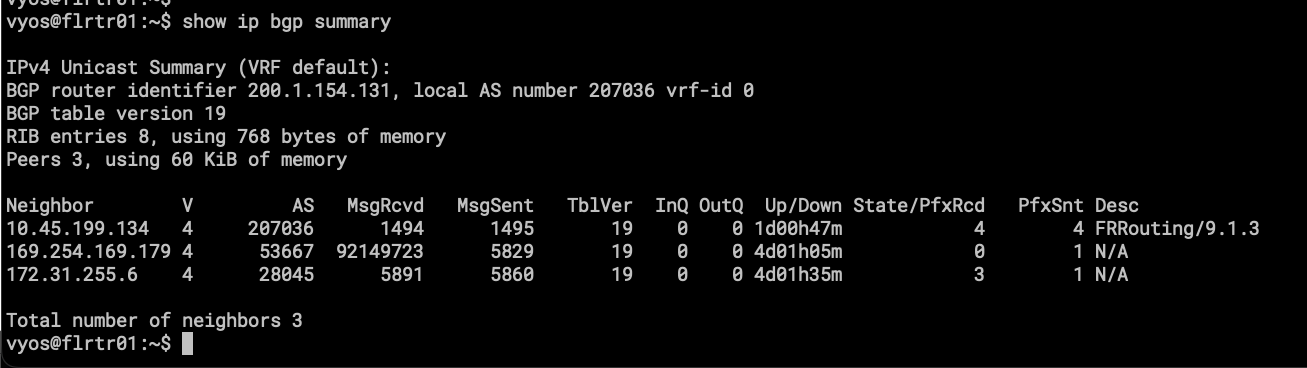
- AS207036 is running on this instance of BGP for upstream connectivity with BGP Providers for transit and peering.
- AS28045 is also here; this is how traffic is being leaked from CORE to EDGE.
Two BGP instances are running and peering with each other using a pair of veth (Virtual Ethernet) interfaces, one in the default VRF and the other in the CORE VRF. This was the easiest way I found to “leak” subnets from one VRF to another.
More information about Virtual-Ethernet: https://docs.vyos.io/en/latest/configuration/interfaces/virtual-ethernet.html
As mentioned, the interesting part is the veth pair. veth1 is in default, and veth2 is attached to CORE. Is like peering between two different routers. I like how I can apply route-maps to this!
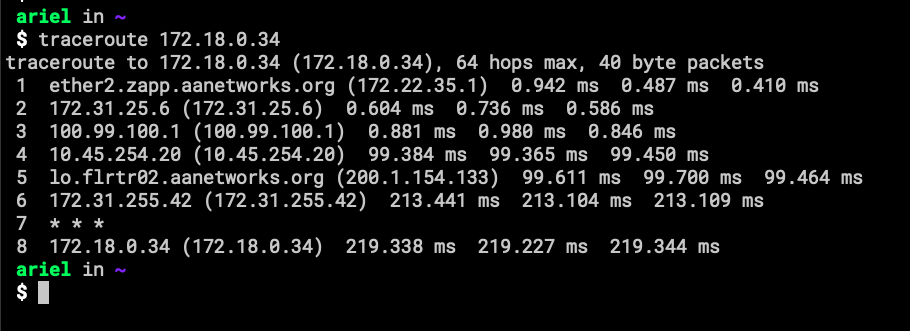
Here is a screenshot showing how traffic is coming from the Internet into my home-network.

I think I will be writing a second part about this topic, a more technical one with the commands for creating the VRF and other configurations.
The conclusion is that now my large-area-network is cleaner than before, was depending on scripts at boot time to create IP rules and Routing tables, sometimes new networks weren’t in the iPrules and traffic didn’t work. The ugly stuff was when I didn’t even remember what I configured to make stuff works. Now at least it is explained in the VyOS Docs. ☺
I will miss working with BIRD and Pathvector !
Still need to reinstall DE and NL….
- This is all the way to the Netherlands. FreePBX connection for old-style calling. The Red Line, as Krsna (a buddy of mine) calls it.